
On a regular basis, the ESXi hypervisors in your environment are updated. When updating to major updates (e.g. ESXi 8.0U3), you have the option to update your vSAN On-Disk Format as well. This allows you to use the new vSAN features for the (major) update/upgrade. Of course, this only applies once you have vSAN running in your environment.
This blog post deals with the steps involved for upgrading the vSAN On-Disk Format using RVC.
We will also brief you on how to do this using the traditional vSphere Client GUI.
VMware Documentation used:
- vSAN On-Disk Format Versions: KB2148493
- Upgrading vSAN Disk Format Using vSphere Client
- Upgrade vSAN Disk Format Using RVC
In vSphere, on the cluster level, you can confirm if an upgrade of the Disk-Format is possible. Navigate to the Cluster > Configure > vSAN > Services. If all ESXi hosts in a cluster are updated to a new level (e.g. ESXi 8.0U3), than a popup appears to upgrade the On-Disk Format from 19 to 20.

Note: in stretched vSAN environments, please make sure to update the vSAN witness (ESXi) host as well, since it is part of the vSAN cluster. vSphere LifeCycle Manager creates baselines for the vSAN witness host, which you can use

After the Pre-Check clears, the interface shows the update is possible

You can proceed in two ways:
- Click on the Upgrade button or
- Upgrade through the RVC, Ruby vSphere Console
This blog post gives more detail on option 2: upgrading the vSAN On-Disk Format using the RVC.
However, we will briefly touch the upgrade through the vSphere Client.
vSAN On-Disk Format Upgrades using vSphere Client
Press on the upgrade button 🙂
Honestly, that’s about it

The process starts; you can monitor it through the vSphere Client itself
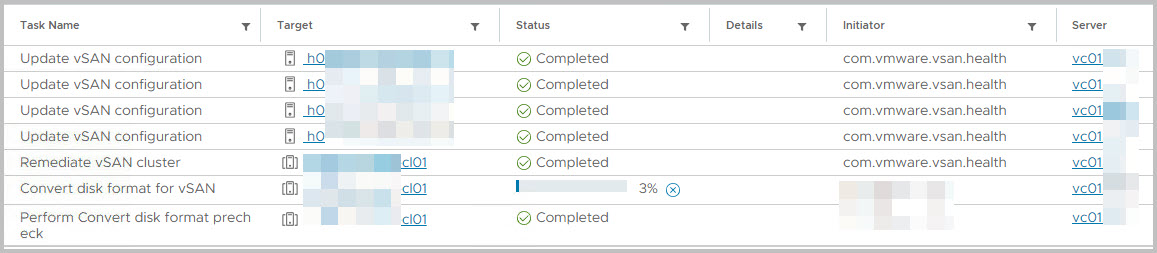
But you can also follow the process in the vSAN GUI : Navigate to the cluster > Configure > vSAN > Services

The last phase is a final check

Before it is completed

vSAN On-Disk Format Upgrades using RVC
This part of the blog gives more detail on option 2: upgrading the vSAN On-Disk Format using the RVC
Connect to vCenter Server through SSH
The following steps are required on the vCenter Server Putty session
Logon to the vCenter Server with root credentials
Type rvc administrator@vsphere.local@localhost (that’s right; a nested @)
A directory structure appears. You can easily navigate to other folders.
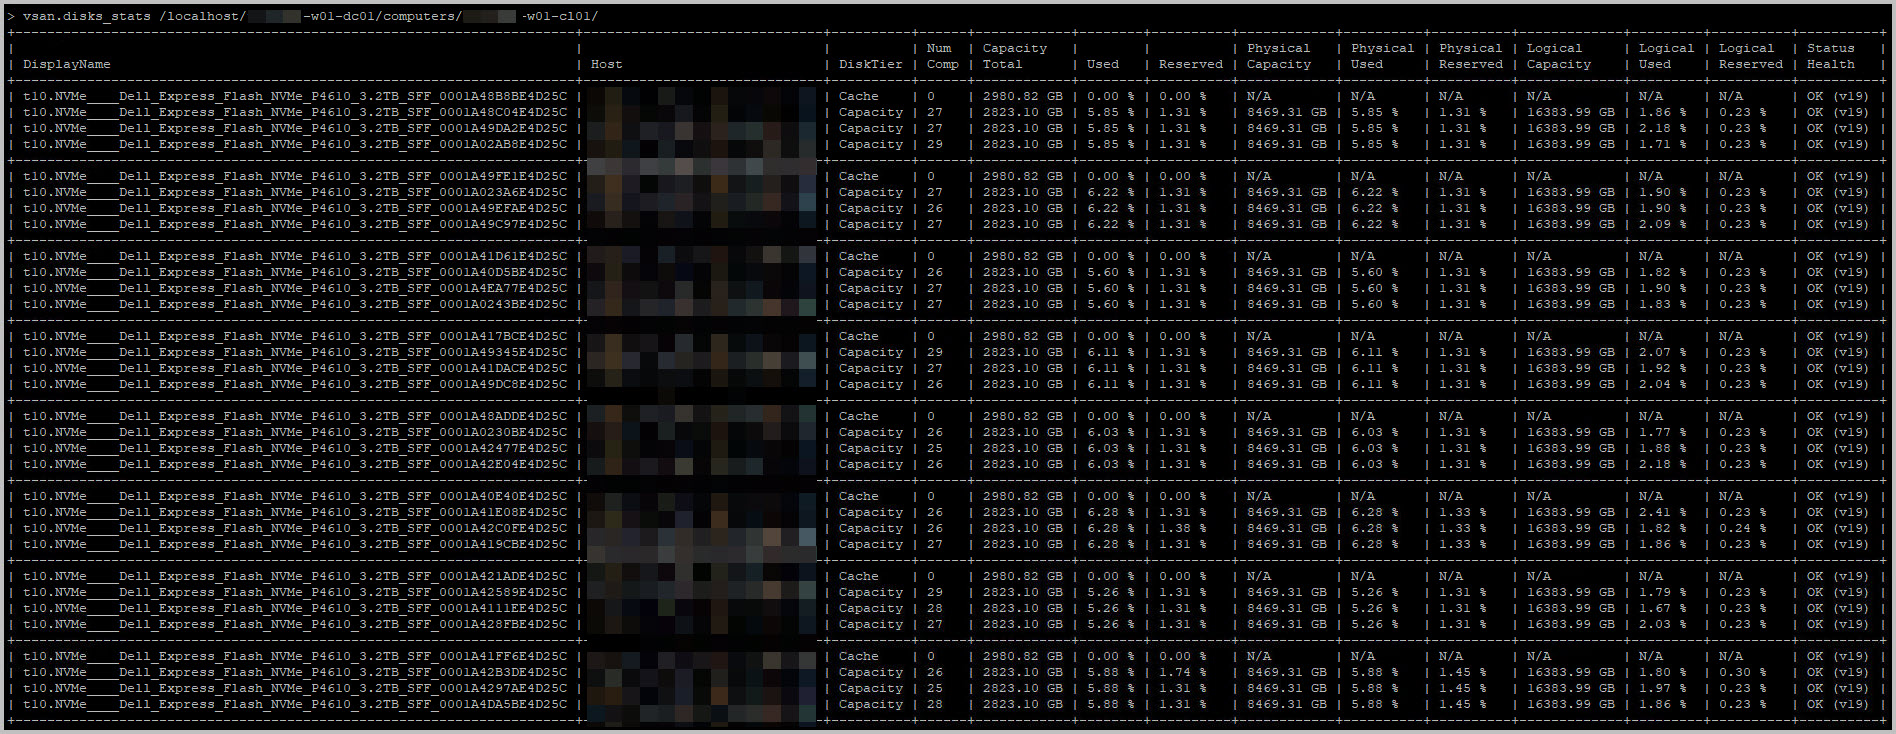
Confirm disk status
Before the upgrade: check the disk stats on beforehand.
To confirm the current disk status per ESXi host per disk group (OSA and/or ESA), you can run the following command:
vsan.disks_stats /localhost/[datacenter]/computers/[cluster]
This is how it looks like with a vSAN OSA (Original Storage Architecture) configuration (VCF Management Domain). Note the disk groups in OSA.

vsan.disks_stats /localhost/[datacenter]/computers/[cluster]
For a vSAN ESA (Express Storage Architecture) configuration (Non-VCF Workload Domain), you will find that the disk groups (as part of OSA) are missing, and all disks are put on one big pile.
If all is well, you can start the upgrade
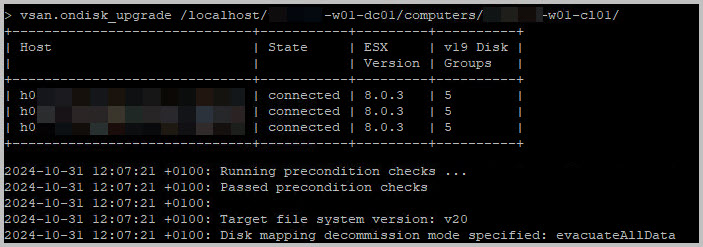
On-Disk Format Upgrade
The command to upgrade the vSAN On-Disk Format
vsan.ondisk_upgrade /localhost/[datacenter]/computers/[cluster]
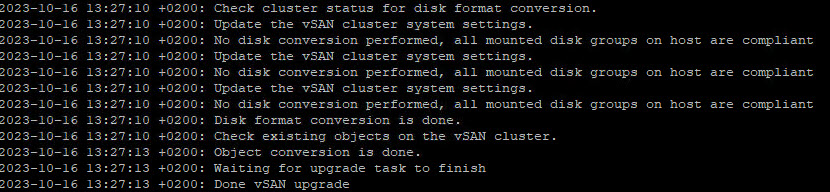
The following output is shown
Now, all you have to do is wait. As before, you will find some progress in the vSphere Client
In small environments, this will take only a few minutes, but can take up until a few hours.
After this, you can fully utilize all new features of the latest version of vSAN ! Don’t forget to navigate to the cluster’s Monitor Tab > Skyline Health. You can view the current state of vSAN.

After the upgrade: check the disk stats and note the differences
vsan.disks_stats /localhost/[datacenter]/computers/[cluster]
This is how it looks like with a vSAN OSA (Original Storage Architecture) configuration (VCF Management Domain). Note the disk groups in OSA.

If you would like to know more about the latest (to this date) vSAN 8.0U3 release, please take a look at the 8.0U3 release notes, as well as this interesting blog post on 8.0U3.
Did you know 8.0U2 introduces vSAN Max, powered by vSAN ESA? This topic is also highlighted by Pete Koehler in his vSAN blogpost