
For years, VMware administrators have relied on VMware Update Manager (VUM) to keep ESXi hosts secure, consistent, and up to date. VUM worked well, but it was based on baseline patching, which often led to configuration drift, dependency challenges, and manual driver or firmware management.
Starting with vSphere 7.0 Update 2, VMware introduced the vSphere Lifecycle Manager (vLCM) as the modern replacement for VUM. Instead of juggling multiple baselines, vLCM enables administrators to manage host updates using a single cluster image that defines:
- The ESXi version
- The vendor add-on (for drivers and vendor-specific software)
- Any required components
- Optionally, a firmware package through vendor HSM integration (e.g., Dell OMIVV, HPE iLO Amplifier)
This shift is not just a product change — it represents a new way of managing lifecycle operations in vSphere. By moving to image-based management, organizations gain:
- Consistency: All hosts in a cluster run the exact same image.
- Predictability: Updates and upgrades follow a repeatable process.
- Vendor integration: Hardware vendors provide certified add-ons and firmware bundles.
- Future readiness: vLCM is VMware’s strategic direction for lifecycle management.
⚠️ Important note on VMware Cloud Foundation (VCF):
vLCM with Single Image is not supported for VCF-managed clusters. In VCF environments, lifecycle management is handled exclusively by SDDC Manager, which maintains strict control to ensure compatibility across the full stack (ESXi, vSAN, NSX, and related components). This means that while standalone vSphere environments can adopt vLCM Single Image today, VCF users must continue to rely on SDDC Manager until VMware provides broader alignment between the two approaches.
Migrating from VUM to vLCM is typically straightforward, but it does require planning, governance, and a clear process. This guide walks through the considerations, best practices, and steps to take when transitioning your environment from traditional baselines to vSphere Lifecycle Manager with Single Image.
What to Expect in VCF
VMware has already indicated that its long-term goal is to bring greater convergence between vLCM and SDDC Manager. The expectation is that vLCM’s image-based lifecycle approach will increasingly be integrated into VCF, allowing for more consistent management across both standalone and cloud foundation deployments.
For now, this means:
- Non-VCF environments should move to vLCM Single Image to align with VMware’s strategic direction.
- VCF environments should continue to rely on SDDC Manager while monitoring VMware’s roadmap for tighter integration.
- Organizations running hybrid setups (VCF + standalone clusters) need to adopt a dual governance approach, with vLCM for non-VCF clusters and SDDC Manager for VCF-managed ones.
Why Migrate?
VMware Update Manager (VUM) has served us well for many years, but it’s showing its age. Baseline patching often led to inconsistent host states, manual driver installs, and a general feeling of “hoping it all matches up.” With vLCM, VMware introduces a modern, image-based approach that solves many of these issues.
By migrating now, you:
- Reduce drift between hosts by enforcing a single golden image per cluster.
- Gain better vendor integration, reducing manual driver and firmware management.
- Future-proof your environment, as vLCM is VMware’s strategic direction for lifecycle management.
- Move toward a more predictable and repeatable operational model.
Staying on VUM isn’t just about missing new features — it risks compatibility gaps, as VMware continues to phase out support for baseline patching.
Pre-Migration Considerations
Before diving into the migration wizard, it’s worth taking a step back and preparing your environment. While the migration from VUM to vLCM is technically straightforward, skipping these checks can lead to frustrating roadblocks later.
- Compatibility check – Confirm that your target ESXi version is supported not only by VMware but also by your hardware vendor and any dependent solutions such as NSX or vSAN. A quick review of the VMware HCL and vendor release notes can save you from unexpected incompatibilities.
- Backups and snapshots – Always make sure you have a safety net. Back up your vCenter configuration and ensure you have host profiles exported, so you can fall back in case the new image causes issues.
- Cluster health – Don’t migrate a cluster that is already in a degraded state. Check for HA or DRS misconfigurations, unresolved alarms, or hardware warnings, and resolve them before introducing a new lifecycle model.
- Pilot first – If you have a test or non-critical cluster, migrate that one first. This gives you valuable insight into timing, dependencies, and vendor add-on behavior without risking production workloads.
Taking these steps upfront helps ensure that your migration is not only successful but also predictable and low-risk.
The Migration Steps (with Screenshots)
This guideline helps you migrate from VUM to vLCM on a per cluster basis.
Therefore, navigate to the cluster and find the Updates tab. You will find the current configuration, most likely set to Baselines.
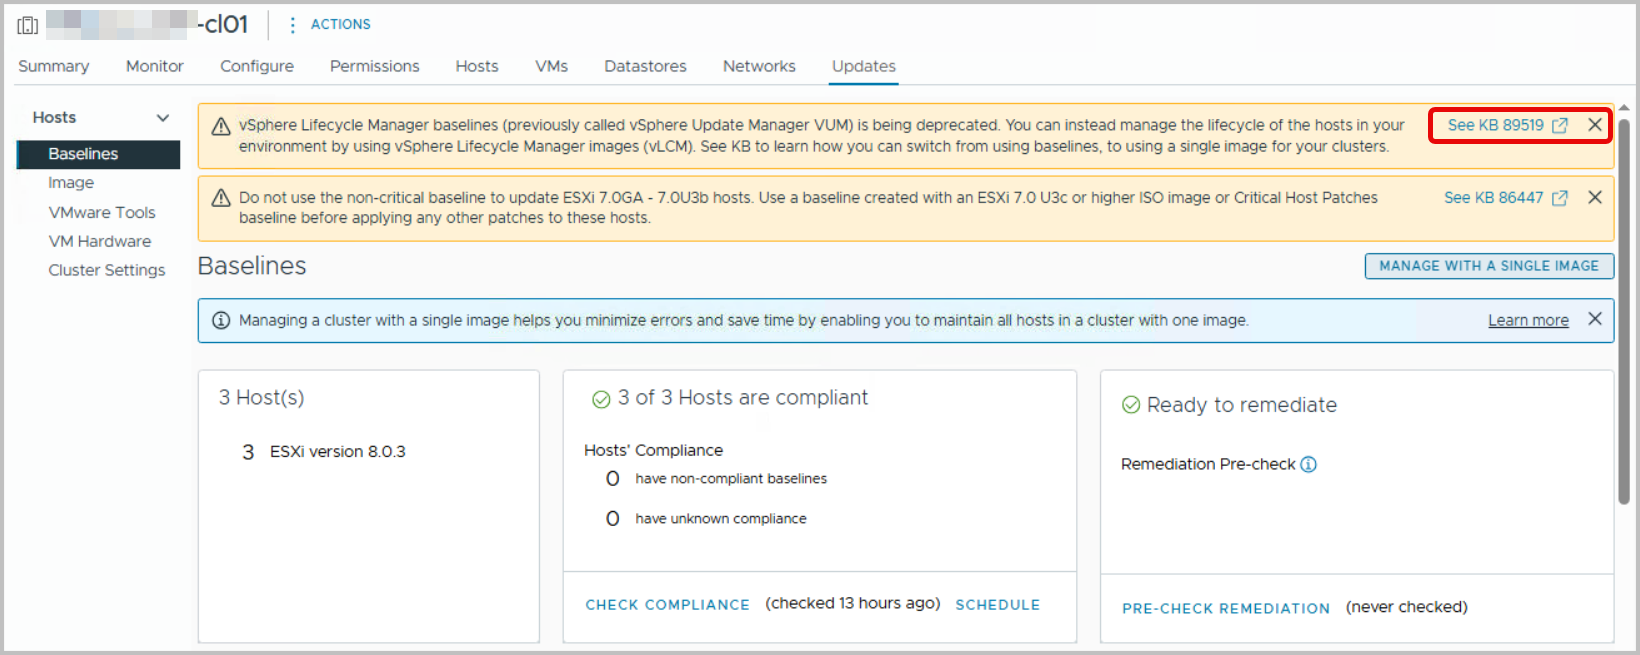
Note that the top link on the right hand side, shows KB89519, highlight Managing ESXi host lifecycle operations.
From here, click the “Manage with a single Image” button, or click on Image on the left-hand side. Proceed, and the window shows you can use one present image as a base to start from. We will choose to Setup an Image manually.
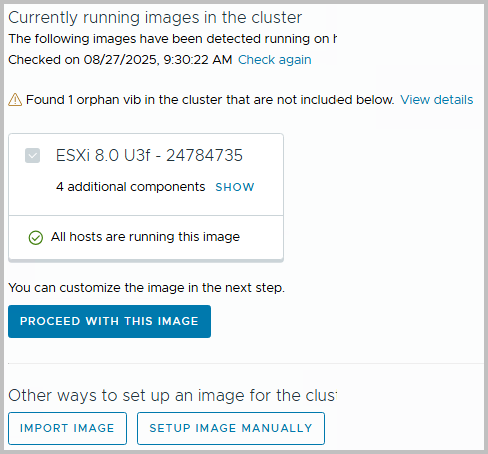
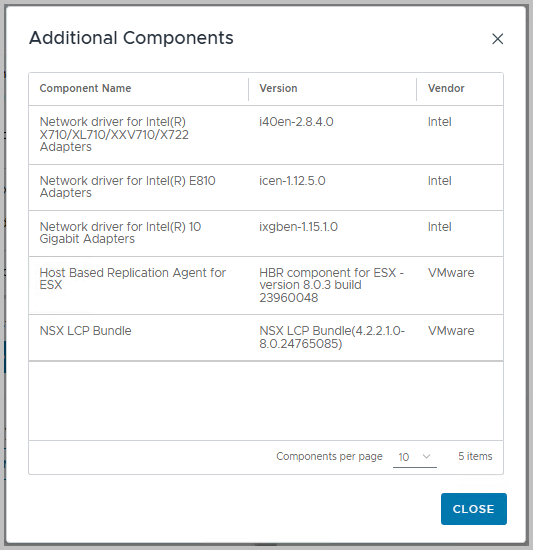
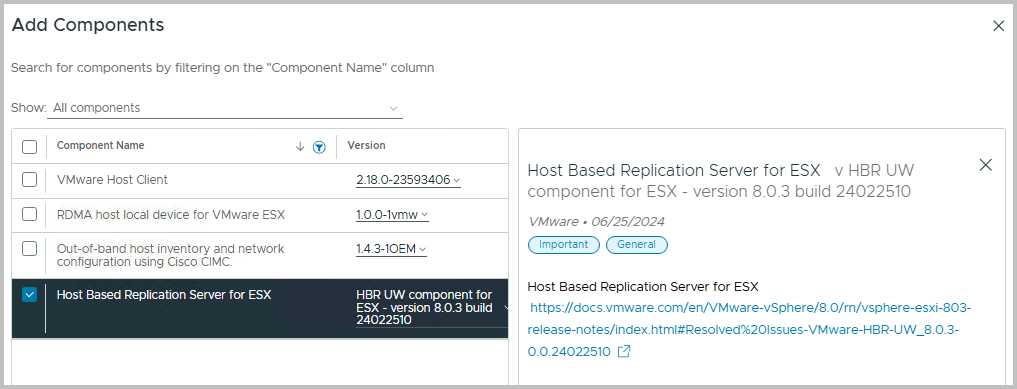
Note however, that you can always select the found Image with (in this case) four additional components. A component is an addition to the base image, and probably some kind of driver.
In our environment, several NIC drivers were added previously – through an extension baseline), as well as the Host Based Replication agent (used for vSphere Replication). These will eventually be part of the image, after we have setup the image manually. The picture below shows what happens if you were to select Proceed with this Image.
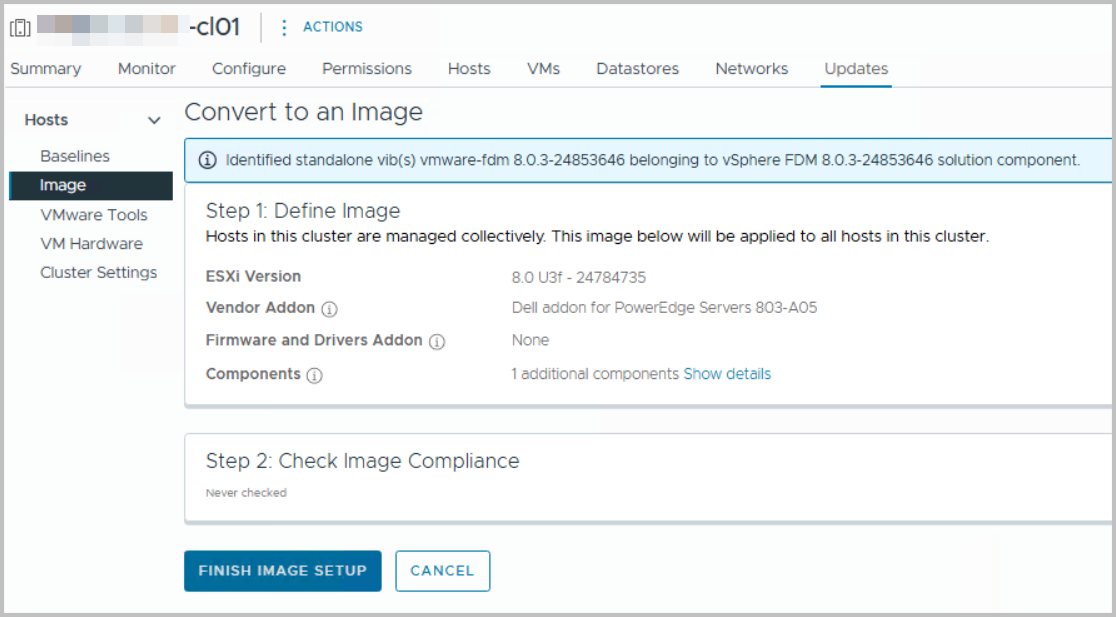
However, as mentioned we will choose to Setup an Image manually. After clicking the “Setup Image Manually” button, the cluster is set to be converted to Image Based. Cluster readiness is also checked.

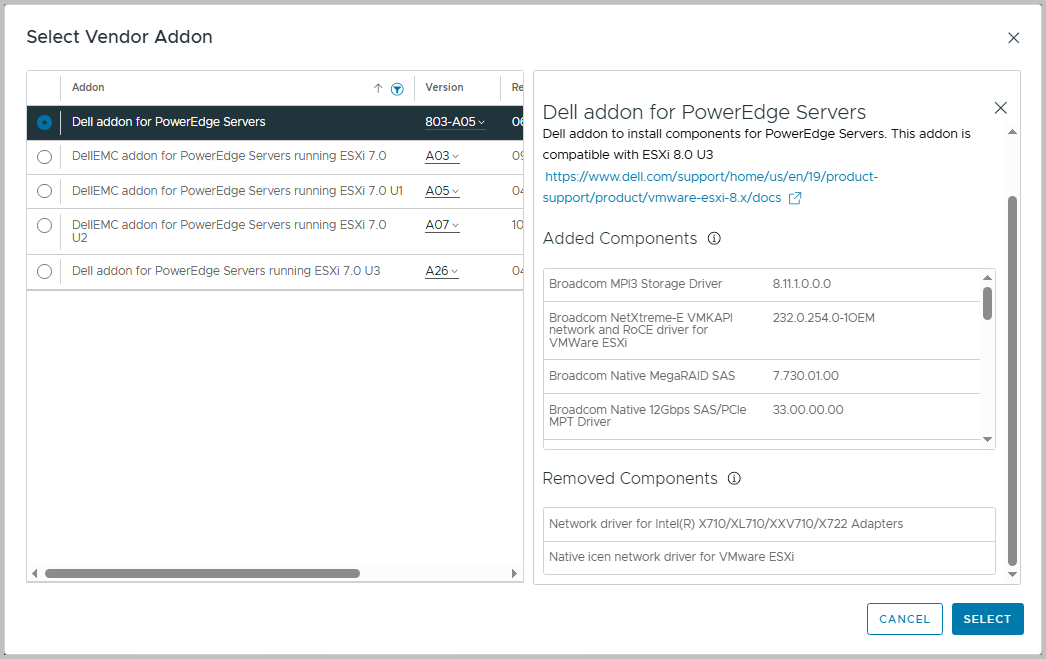
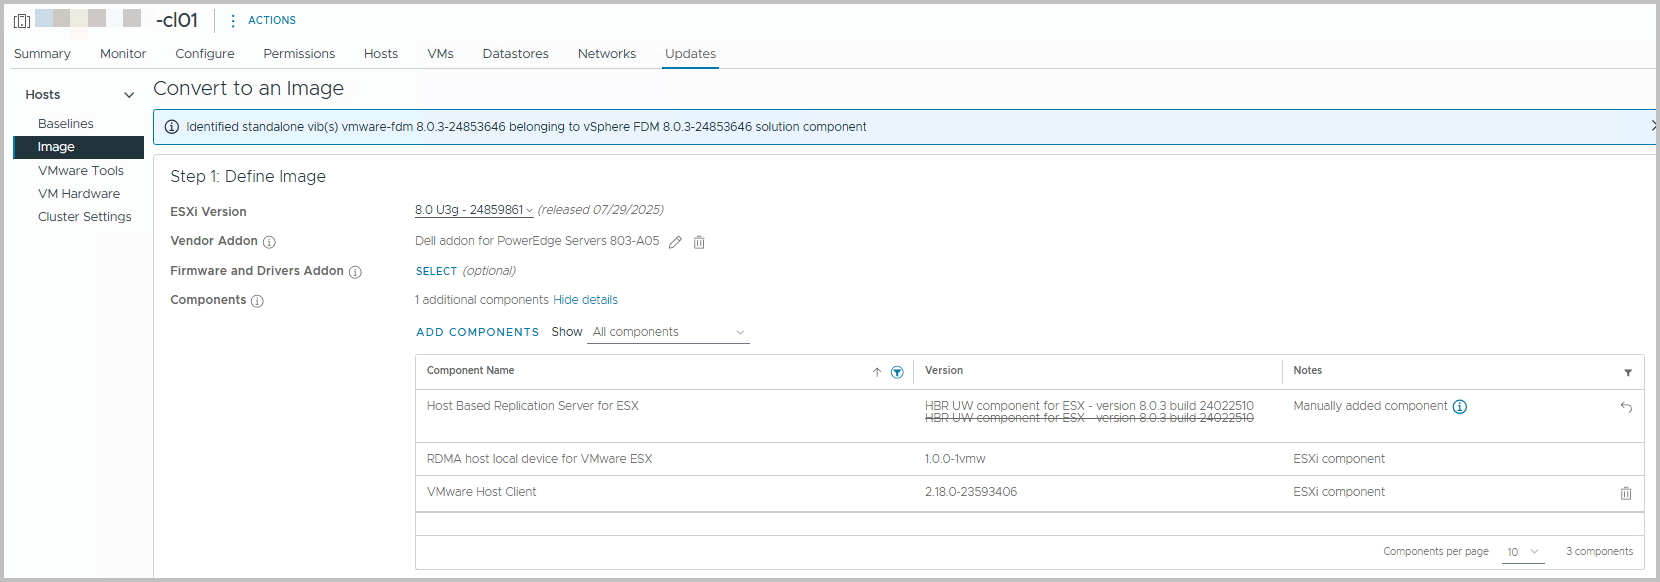
From here, you can edit the ESXi version, the vendor Addon (see below, e.g. Dell addon for PowerEdge Servers)
You also have the option to add Components, such as the HBR agent.
After you have added to ESXi version, the Vendor Addon, as well as some components, if required, you have a screen as the following. A summary shows which components are removed and/or added during the implementation of the Cluster Image.
Once ready, you can Finish Image Setup now. Image Compliance will be checked afterwards automatically.
Note that if the ESXi cluster is also configured as an NSX cluster, you will notice the vLCM tag is set as well, in NSX > System > Fabric > Hosts
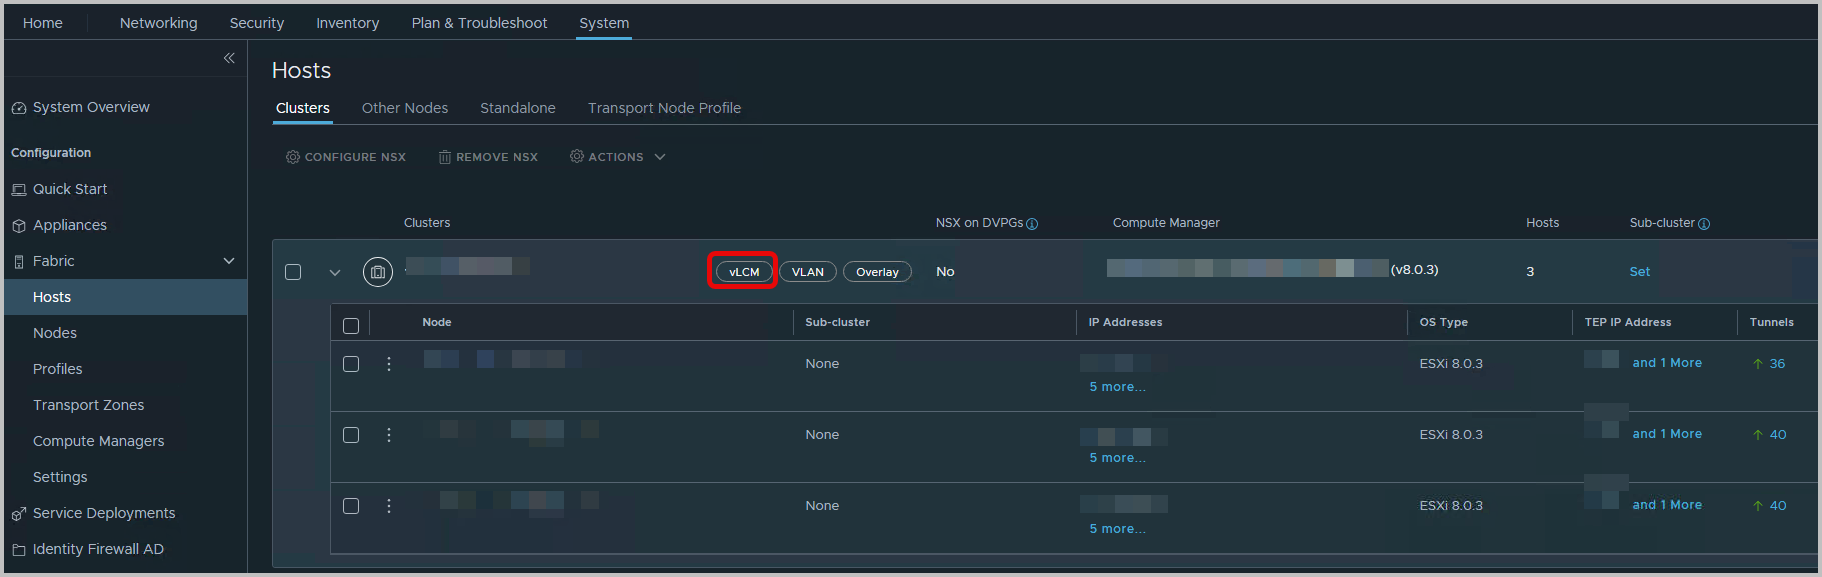
This indicates the NSX Solution has become part of the cluster’s vLCM configuration.
Also note that, an informational message appears the NSX Solution is not enabled yet. Even though the NSX VIB might be installed, enabled and configured since, the ESXi update, Host Remediationusing vLCM, has not taken place yet, and the image itself is not compliant in itself.
From vSphere Lifecycle Manager, the Check Compliance shows results. In this case, there is also a drift for some NIC drivers. But these will be resolved through the Dell addon for PowerEdge Servers (803-A05)
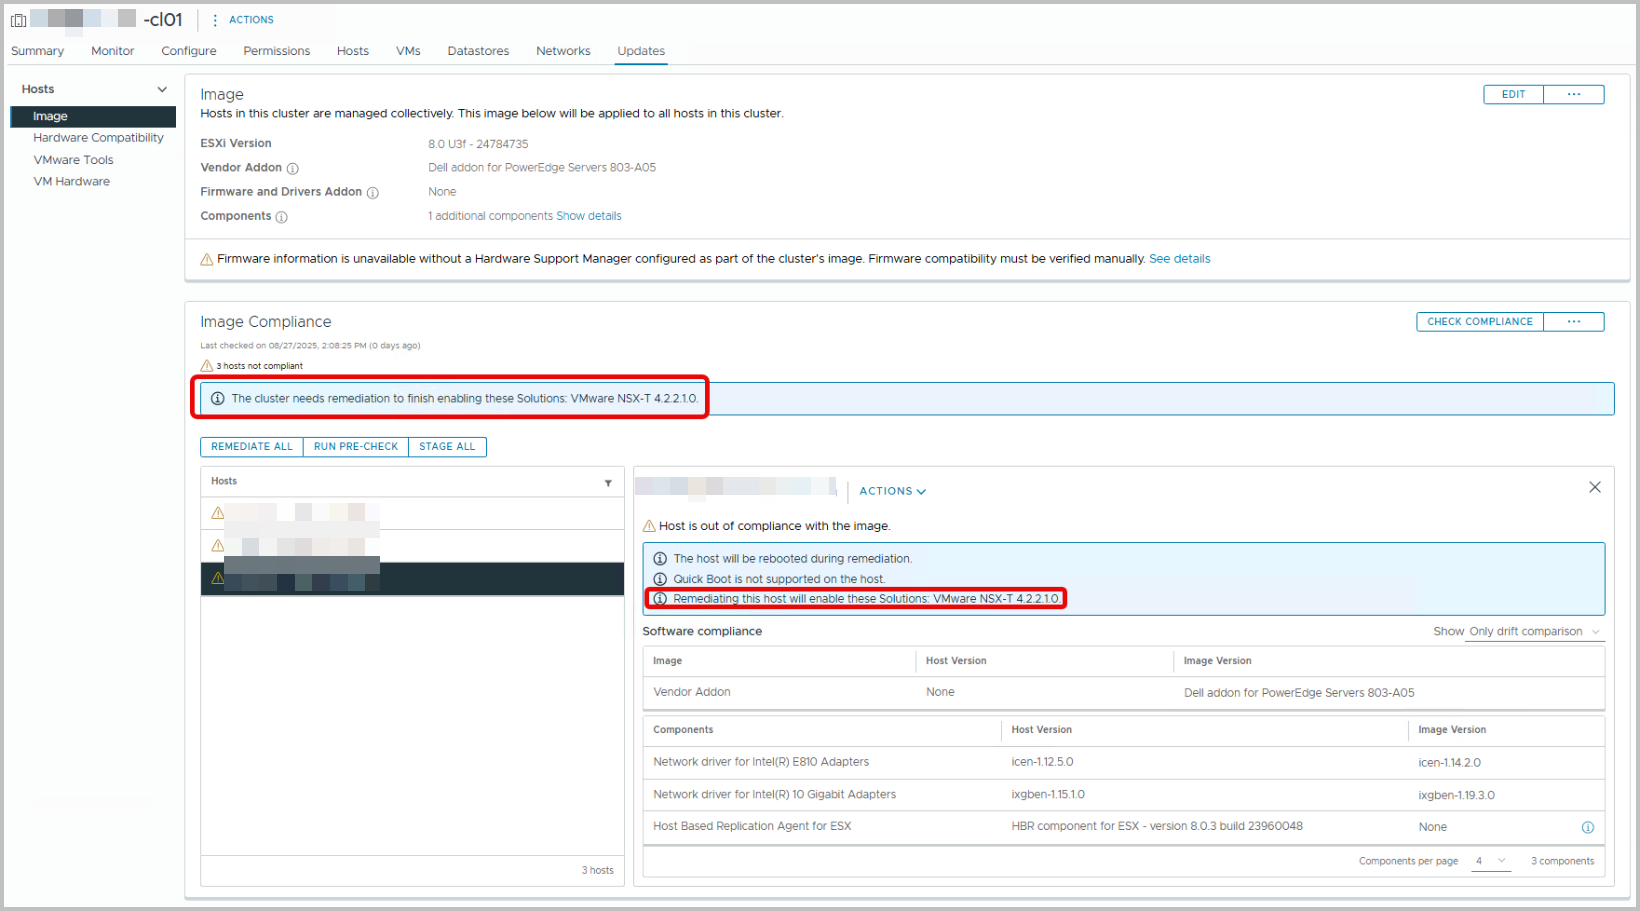
Note that the Informational remark “Remediating this host will enable these Solutions: VMware NSX-T 4.2.2.1.0” shows… The reason why is that:
- Even though the cluster image definition is created, it has not yet been applied (remediated) to all hosts.
- At this point, vLCM compares the desired Image (ESXi version + vendor addon + components + firmware, if applicable) against what is actually installed on each host.
- Some features (like NSX-T) rely on specific vSphere Installation Bundles (VIBs) or solutions to be present. These are delivered and activated during the first remediation with vLCM.
- Therefore, the compliance check tells you: “If you remediate, these additional solutions (e.g., NSX-T 4.2.2.1.0) will be enabled/activated.”
- Essentially, it is warning you that remediation will align the host image with the desired state, which includes enabling NSX-T’s VIBs and services
In other words: this message is a preview/warning: remediation will enforce the full Single Image, which includes enabling NSX-T VIBs on the host. It’s expected the first time you run compliance after migration 🙂
Click “Check Compliance”, wait a while and look at the findings. They should not surprise you. From this point on, you can start remediating: press Remediate All.

You can review the Remediation Impact. Everything is nicely written down.
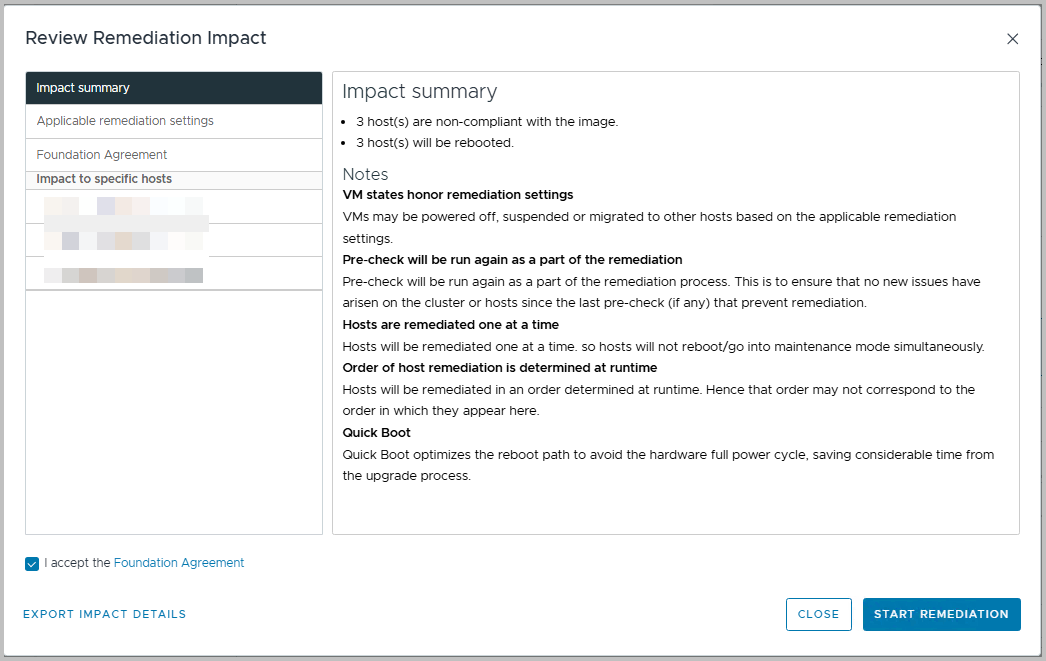
Now, click “Start Remediation” and wait and relax.
All steps that are part of remediation will be outlined.
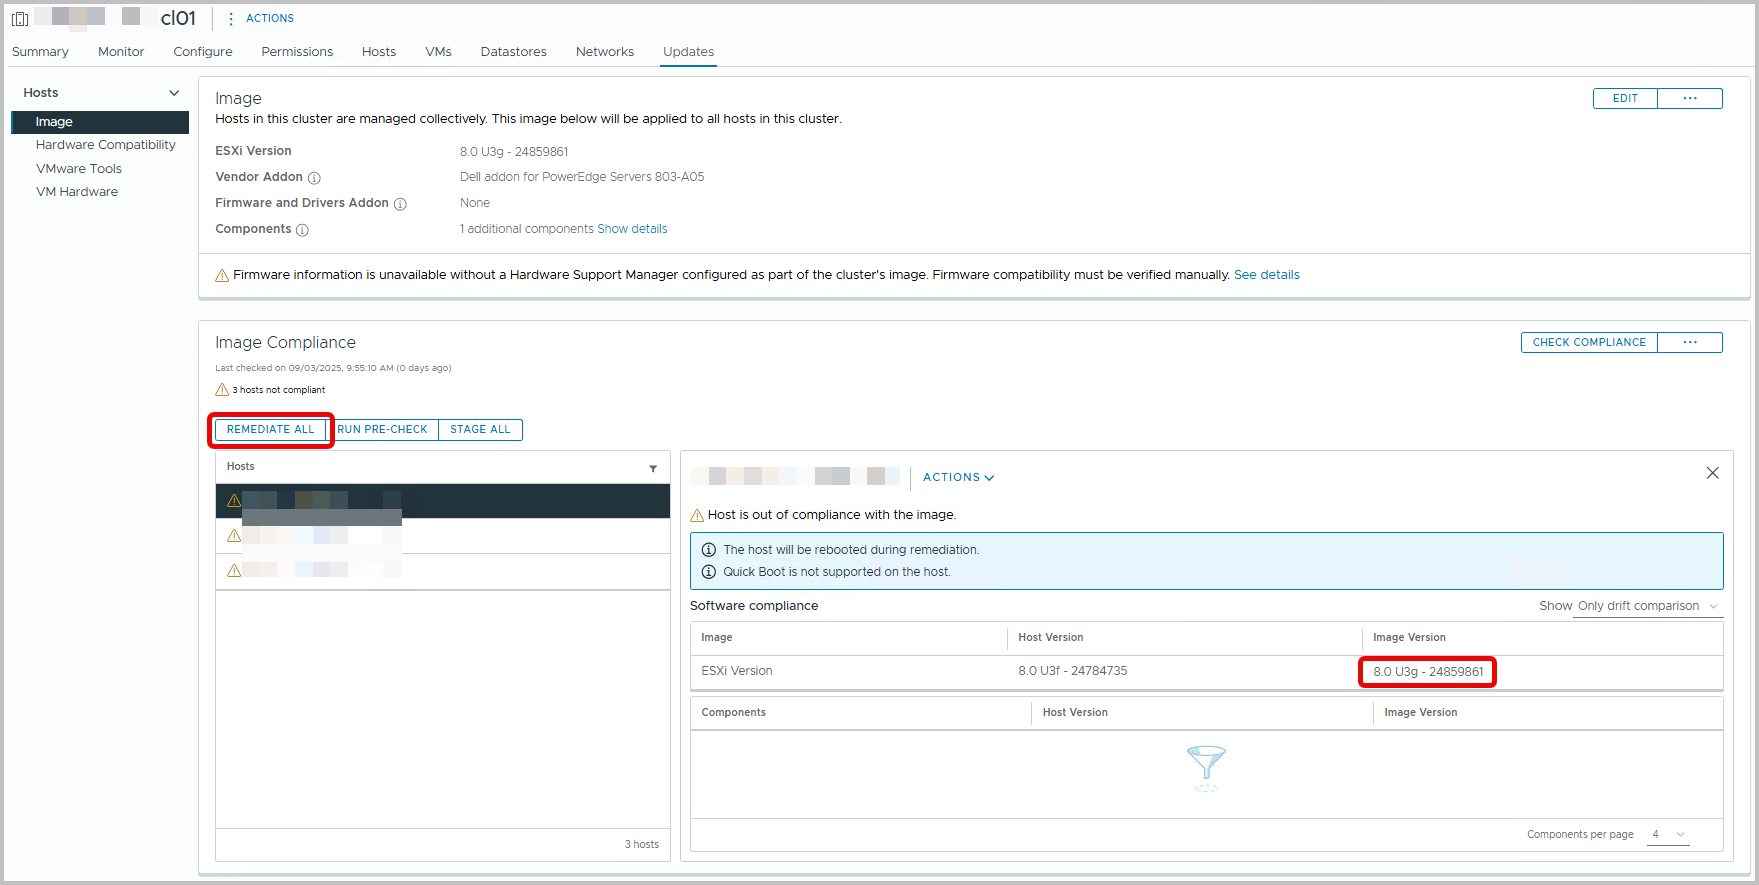
After a while all hosts are remediated, updated, reflecting all necessary patches.
For now, vSphere has no Central Management pane for vSphere LifeCycle Management. However, if you are looking to check cluster compliancy on a vCenter level, I have a PowerCLI oneline for you:
Get-Cluster | Where-Object { (Test-ClusterImageCompliance -Cluster $_).Status -eq "NonCompliant" } | Select-Object Name
You can integrate in anywhere you’d like.
Cluster-Specific Nature of vLCM Images
One important detail to keep in mind is that vSphere Lifecycle Manager Images are defined at the cluster level.
- Each cluster has its own Image definition, based on the chosen ESXi version, vendor add-on, and additional components.
- This means that when you migrate to or manage with vLCM (Single Image), you need to configure and maintain the Image per cluster
For organizations with multiple clusters that should follow the same golden standard, VMware provides a way to export and import Image configurations:
- You can export an Image definition as a JSON file.
- This JSON can then be imported into another cluster, making it easier to replicate the same desired state across multiple clusters.
This approach ensures consistency while reducing the manual effort of configuring every cluster from scratch. However, remember that the lifecycle operations (compliance checks, remediation, etc.) remain strictly tied to the individual cluster where the Image is applied.
Technical Challenges & Gotchas
Not everything is smooth sailing with vLCM — and knowing the pitfalls helps you prepare.
- NSX integration: NSX clusters show as “vLCM-managed,” but upgrades may require newer ESXi versions than you want. Always check NSX compatibility before remediation.
- Firmware updates: Without a Hardware Support Manager (e.g., Dell OMIVV, HPE iLO Amplifier), firmware still requires separate handling.
- Cluster-only images: vLCM images cannot be applied at datacenter or vCenter level — you’ll repeat the process cluster by cluster (though images can be exported/imported for reuse).
- Time impact: Adding firmware updates makes remediation significantly longer. Plan maintenance windows accordingly.
Vendor Add-ons & Best Practices
One of vLCM’s strengths is vendor integration — but you need to choose wisely:
- Always use the latest vendor add-on: Vendors like Dell explicitly recommend this, as it ensures drivers are up to date with the latest security fixes and supported firmware.
- Align with your hardware model: Don’t assume the same add-on applies across hardware generations. Always double-check vendor release notes.
- Document your standard: Define which vendor add-on version is approved for which cluster types. This avoids accidental mismatches between environments.
Governance & Process
Migrating is one thing — sustaining it is another. To ensure vLCM becomes part of your standard operating model:
- Golden image policy: Define what a “golden image” looks like for each cluster type (management, edge, vSAN, etc.).
- Change management: Embed vLCM steps into your ITIL change process or Jira workflows. Every update should follow a consistent path.
- Work instructions: Update runbooks and operational procedures so teams know exactly how to handle lifecycle events under vLCM.
- Roles & responsibilities: Decide who approves images, who executes remediation, and who validates afterwards.
This governance is what turns vLCM from a tool into a reliable practice.
VCF Limitation
⚠️ A key limitation: vLCM with Single Image is not supported in VMware Cloud Foundation (VCF).
⚠️ Important – VCF Limitation
Do not enable vSphere Lifecycle Manager (vLCM) Single Image on VMware Cloud Foundation (VCF) managed clusters.
- In VCF, SDDC Manager controls lifecycle management.
- Switching to Image-based management in vCenter will break support and cannot be reverted.
- Always use SDDC Manager for upgrades and patches in VCF.
In VCF, all lifecycle management is performed by SDDC Manager, which enforces compatibility across the full stack (ESXi, NSX, vSAN). If you run VCF, you’ll need to:
- Stick to SDDC Manager for lifecycle tasks.
- Avoid making manual changes via vLCM in those clusters.
- Adopt a dual governance model if you manage both VCF and standalone clusters.
💡 Tip – Preventing Accidental Image Activation in VCF
To avoid enabling vLCM Images in VCF clusters by mistake:
- Restrict permissions with RBAC so only approved admins can access vLCM Image features.
- Document the restriction clearly in your runbooks and change process.
- Monitor for changes to cluster lifecycle mode using vCenter events or Aria Operations.
- Separate roles between teams managing VCF and non-VCF environment
Testing & Rollback Strategy
Like any major change, it pays to have a fallback plan:
- Test first: Validate the process on a lab or non-critical cluster.
- Rollback option: Keep old ISOs and export existing images before upgrading. If something breaks, you can re-import and remediate back.
- Communication: Let stakeholders know about extended maintenance windows when testing firmware updates.
A structured rollback plan gives everyone confidence to proceed.
Post-Migration Validation
Completing the migration is only half the job — validating that your environment is healthy afterwards is just as critical. vLCM provides compliance checks, but it’s good practice to perform a broader validation:
- Cluster compliance – Run a compliance check in vLCM to verify that all hosts are aligned with the new cluster image. Resolve any drift immediately.
- Core functionality – Test the basics: vMotion between hosts, DRS load balancing, and HA failover. These services rely on consistent host configurations, so they’re an excellent indicator that your image is applied correctly.
- Storage and networking – Validate that storage paths are intact and networking (including vDS or NSX segments) is functioning as expected. If firmware updates were part of the process, double-check connectivity to storage arrays.
- Solution health – For environments running vSAN, NSX, or other VMware solutions, review their respective dashboards to confirm cluster health. It’s not uncommon for dependent solutions to surface issues if there are mismatches in driver or firmware levels.
- Operational sign-off – Before handing the cluster back into production rotation, ensure that monitoring, alerting, and backup solutions confirm the cluster is fully operational.
By taking the time to validate after migration, you reduce the risk of hidden issues surfacing later and ensure that your new vLCM process is trusted by both technical teams and stakeholders.
Lessons Learned & What’s Next
Migrating to vLCM is not just a technical upgrade — it’s an operational shift.
Lessons learned from the field:
- Export/import images to save time across clusters.
- Always check vendor documentation for add-ons.
- Don’t underestimate the added time firmware remediation takes.
What’s next:
- Expect tighter integration of vLCM with SDDC Manager in VCF in the future. VMware has signaled its intent to unify lifecycle management.
- Start building a standard release cycle for golden images (e.g., quarterly updates), so lifecycle management becomes routine rather than reactive.